CPL-N100 Square Billet/Round Billet Mold Surface Detection
Sep 3rd, 2024 at 08:42 Services Delhi 26 views Reference: 50866Location: Delhi
Price: Contact us
Overview
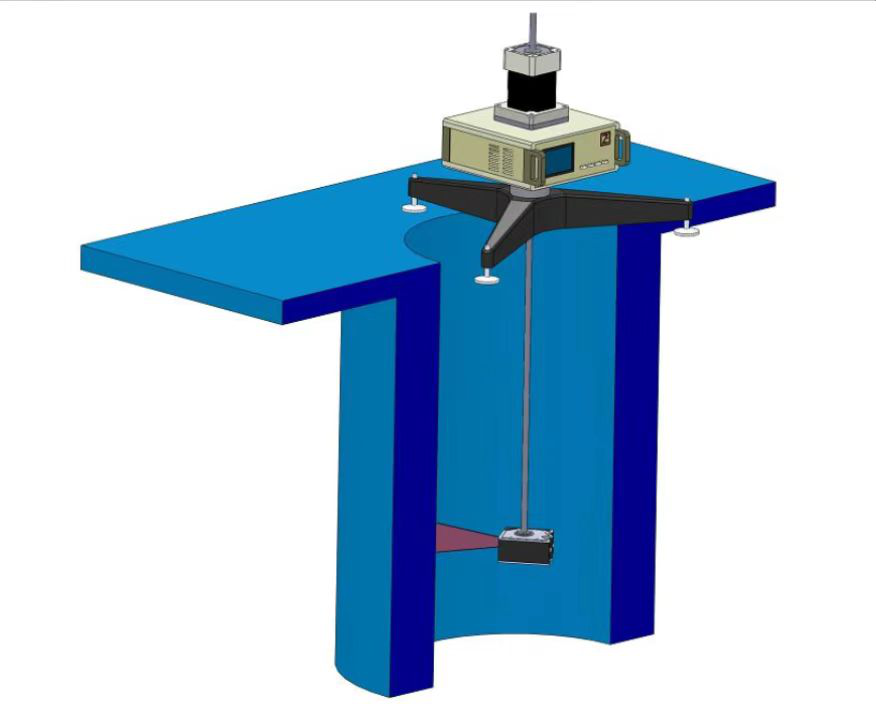
This product is a new type of mold copper plate surface detection equipment. The equipment adopts a high-precision and high-sensitivity laser ranging sensor, which scans the copper plate of the mould by scanning a laser line with a fixed width, and returns the measurement data in real time. After modeling and analyzing the data, the upper computer gives the wear data of the mold copper plate, as well as the data of surface cracks and surface flatness. The host computer software intuitively reflects the surface profile of the detected mold and thickness deviation and other data to the user in the form of data sheet, data curves and mold 3D model diagrams, providing a true and reliable theory for on-site operators to maintain the mold.
The mold surface detection equipment is a high-precision instrument, which includes high-precision laser ranging sensors, two digital servomotors, encoders, horizontal sliding screws, vertical sliding screws, and calibration consoles, controllers and other components. The equipment has many advantages such as high accuracy, strong stability, convenient installation and strong observability. It is suitable for mold surface detection, surface flatness analysis, surface flaw detection, taper measurement, etc. It is also suitable for round billets, square billets, slabs, special-shaped billets, etc., widely used and powerful.
The composition of the system
1. The mold surface detection equipment is equipped with: data processing and display unit, horizontal motion mechanical power output unit, vertical mechanical power output unit, instrument motion control unit, laser measurement sensor, and instrument bracket.
2. Data processing and display unit: used for data acquisition and storage, system equipment control, parameter configuration, height display of the descent, start and stop control, etc.
3. Horizontal motion mechanical power output unit: the digital servo motor in the horizontal direction controls the sensor to move in the horizontal direction, so that the sensor can scan the horizontal inner cavity wall of the mold copper plate to detect data.
4. Vertical mechanical power output unit: the digital servo motor in the vertical direction controls the sensor to move in the vertical direction, so that the sensor can scan the vertical cavity wall of the mold copper plate to detect data.
5. Instrument motion control unit: It is used to control the motion scanning of the motor, and the running speed, running track, and control mode of the motor can be configured through parameter settings.
6. Laser measurement sensor: The laser displacement sensor adopts the principle of laser triangulation. The laser transmitter shoots the visible infrared laser to the surface of the measured object through the lens, and the laser reflected by the object passes through the receiver lens and is received by the internal line array image processing sensor. According to different distances, the corresponding positions of the light spots received on the line array sensor are also different. According to the angle of this reflection, the distance between the actual objects can be calculated by calculating the distance of the sensor spot.
7. Instrument bracket: The mold surface detection equipment need to be placed directly above the mold when it is in use, and it is required to be fixed firmly without displacement vibration during the measurement process to ensure the measurement accuracy.
The parameters
Detection instrument service life: ≥5 years;
Detection instrument reliability: more than 98%;
Detection range: 60~1000mm (customizable)
Detection accuracy: 0.01mm
Spot diameter: 1.0x1.5mm (spot scan), 1.0x20mm (line scan)
Falling pace: 1~20mm/step
Single measurement time: less than 2min
Power supply: DC24V
Operating temperature: -20~80
Equipment warm-up time: 3~5min
Shock resistance: 50G (X, Y, Z axis)
Vibration resistance: 10Hz~5Hz (amplitude 1.5mm, each 2 hours in X, Y, Z axis)


